@deadropine
I'm planing to use QS Motor CT-22 48v 144v programmable electric motorcycle speedometer.
===============================================================================
Initial setup for Tromox Mino:
P 6610 Parameter set password
setting, current value, description
0 225 Speed (Hall signal fequency Hz at 60 km/h)
1 225 Mileage (Hall signal fequency Hz at 60 km/h)
2 551 20% Charge Voltage
3 592 40% Charge Voltage
4 632 60% Charge Voltage
5 673 80% Charge Voltage
6 714 100% Charge Voltage
7 551 20% Discharged voltage
8 592 40% Discharged Voltage
9 632 60% Discharged Voltage
A 673 80% Discharged voltage
B 714 100% Discharged voltage
C 300 Deboost battery charge level in seconds (100% to 0%)
D 510 0% Charge Voltage
E 510 0% Discharge Voltage
F 1 Charge Memory %
R 0 Low Charge Warning voltage (not supported)
H 20
L 120
J 30 Battery charge level status interval in seconds
===============================================================================
Clock adjust
With the power off, press and hold the [ADJ] button down while turning the ignition key on. The display will turn on and the" minutes" will start to flash, which indicates that they are ready to be modified. Release the [ADJ] button then either use short presses of the [ADJ] button to increment the minutes by one, or press and hold the [ADJ] button which will cause the minutes to increment continuously until you release the button. To select the hours, click the [SEL] button once -- this will cause the hours to flash, indicating that they are ready to be modified. Once again you can either use short presses of the [ADJ] button or press and hold the [ADJ] button to make changes to the hours. When done, click the [SEL] button once more and the clock will be all set and the dash will return to normal operation. To make additional changes to the clock, turn the power off and start all over again.
Metric/Imperial Switching
With the display on, simply press and hold the [SEL] button for 10 seconds. This will toggle things from metric to imperial measurement (and vice versa).
Reset the Trip Odometer
With the display on, simply press and hold the[ADJ] button for 3 seconds. This will this will clear the trip odometer.
Reset the total Odometer back to zero
Hold down [SEL] for power on, enter the code interface, the display shows P-0000 lower bit 1Hz flash; under the code interface, short press flash place means add one number from 0-9 for recycle; long press flash place means shift left for one digital; After four numbers are added, if you entered code 8810, the total trip will reset to zero. If you entered code 6810, then you will enter the odometer setting interface (see below); If you entered any other numbers, it will jump back to code interface, P-0000.
Adjusting the Speedometer Parameters
With the power off, press and hold the [SEL] button, then turn the ignition key on. The display will show "P-0000" which is where you enter one of three codes to make changes to the unit. To change the speedometer values, the code you want to enter is 6610.
To do so, you modify each digit one at a time starting from the right. A single click of the [SEL] button will increment the current flashing value (e.g. 0 becomes 1, 1 becomes 2, and so on). Keep clicking until the value you want is showing. Then press and hold the [SEL] button for three seconds to jump to the next digit to be modified and so on. When you have finally entered the value of 6610, then press and hold the [SEL] button and you will be taken to the Parameter Setting Interface.
===============================================================================
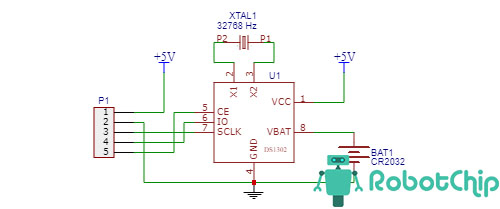
I will not use backup power wire for RTC clock (yellow wire), so I added backup battery (CP2032) to RTC chip (DS1302). I unsolder pin 8 and solder two thin wires to pin 8 (red) and GND (black). Other wire ends solder to battery holder (from old PC motherboard). The speedometer PCB has not space for battery holder, so I wraped the battery holder with foam rubber and place it in bottom part of the speedometer body, under speedometer PCB.
- podklyuchenie-ds1302-k-arduino_3.jpg (43.62 KiB) 4684 mal betrachtet